Deploying a honeypot in Azure

Deploying an SSH Honeypot in the Cloud
Introduction
This project aims to deploy a Honeypot within the Azure Cloud environment using TPOT, with the primary objective of uncovering the tactics employed by potential attackers. The focus is on detecting and analyzing automated brute-force attacks executed by bots, in order to gather valuable behavioral insights that can be used to strengthen and improve security defenses.
Objectives
Deploy Honeypot in Azure.
Attract Automated Brute-Force Attacks.
Data Collection and Analysis.
Extract Behavioral Information.
Topology
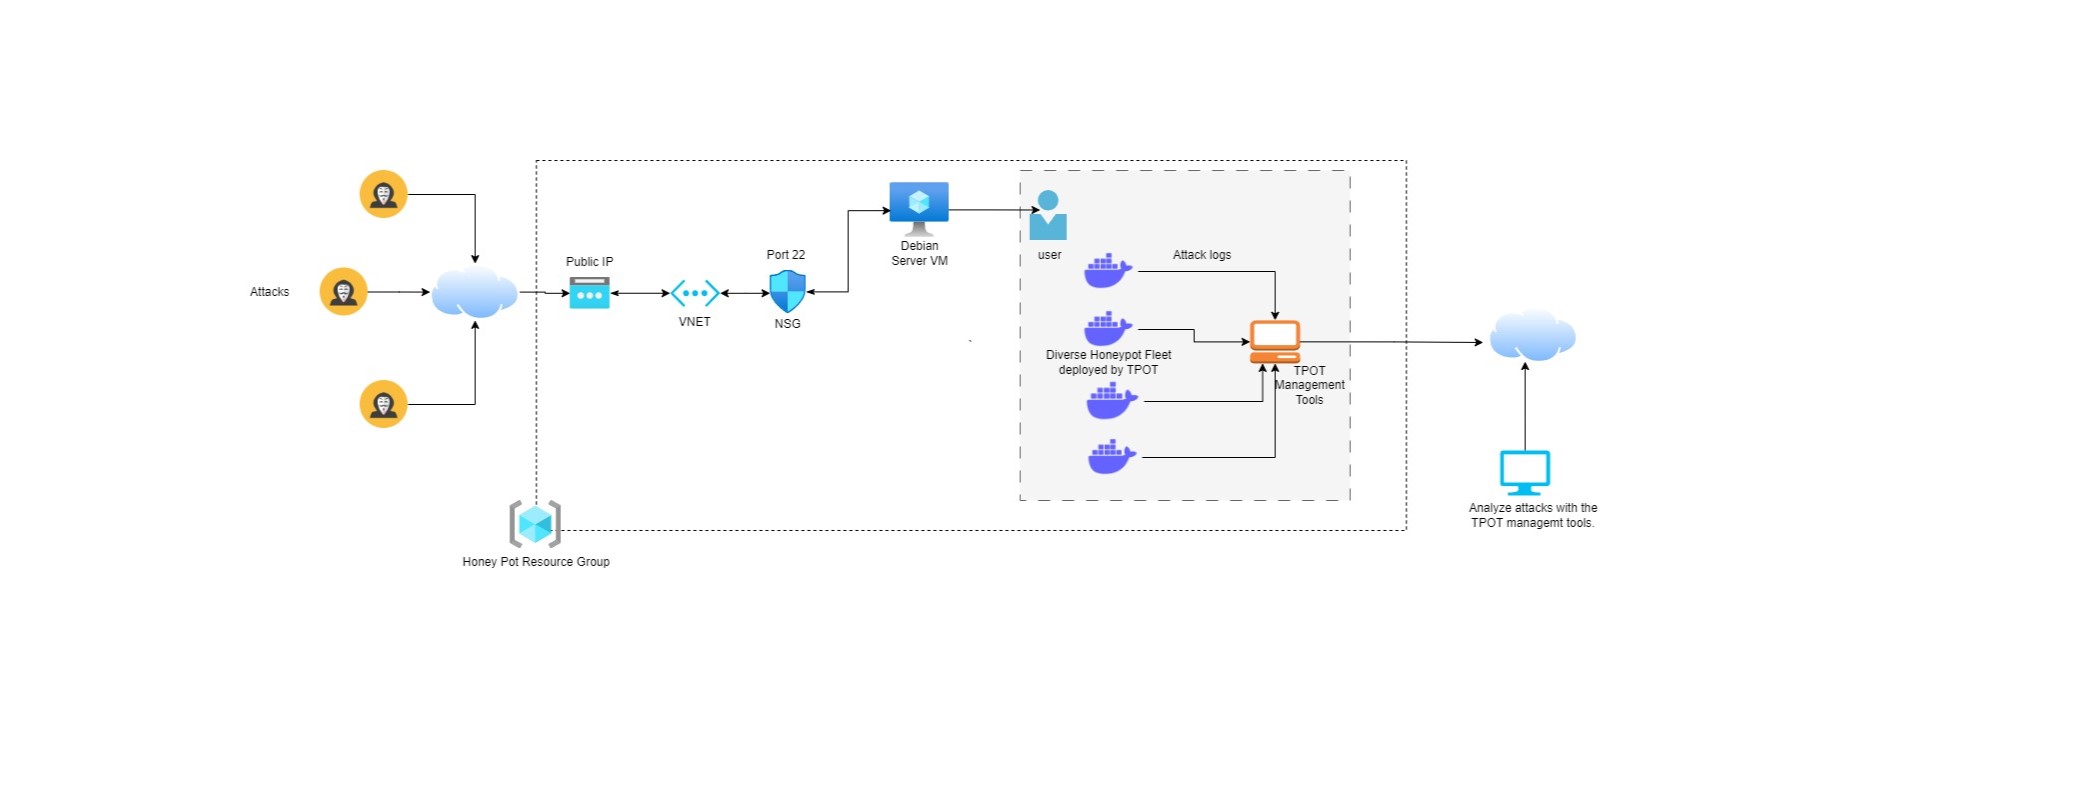 TPOT Container Topology
Tools
To execute this project, the following tools and resources are used:
- Desktop/laptop PC
- Cloud provider account (e.g., Azure)
- Cloud virtual machine (VM)
- TPOT by TeleKom Security
Automating Resource Deployment with Terraform
To streamline the creation of Azure resources, Terraform is employed. The deployment process is as follows:
- Confirm Azure CLI login :
az login. - Validate account details :
az account show. - Initialize Terraform :
terraform init. - Preview resource creation :
terraform plan. - Apply the configuration :
terraform apply.
Please Refer to the provided Terraform code below for resource deployment.
1
2
3
4
5
6
7
8
9
10
11
12
13
14
15
16
17
18
19
20
21
22
23
24
25
26
27
28
29
30
31
32
33
34
35
36
37
38
39
40
41
42
43
44
45
46
47
48
49
50
51
52
53
54
55
56
57
58
59
60
61
62
63
64
65
66
67
68
69
70
71
72
73
74
75
76
77
78
79
80
81
82
83
84
85
86
87
88
89
90
91
92
93
94
95
96
97
98
99
100
101
102
103
104
105
106
107
108
109
110
111
112
113
114
115
116
117
118
119
120
121
122
123
124
125
126
127
128
129
130
131
132
133
134
135
136
137
138
139
140
141
142
143
terraform {
  required_providers {
    azurerm = {
      source  = "hashicorp/azurerm"
      version = "3.87.0"
    }
  }
}

provider "azurerm" {
  features {}
}


# create the Resource Group
resource "azurerm_resource_group" "HoneyPot_GRP" {
  name     = "HoneyPot"
  location = " eastus"
}

# Create VNET
resource "azurerm_virtual_network" "Pot" {
  name                = "Honeypot_VNET"
  address_space       = ["10.0.0.0/24"]
  location            = azurerm_resource_group.HoneyPot_GRP.location
  resource_group_name = azurerm_resource_group.HoneyPot_GRP.name
}

#Public IP
resource "azurerm_public_ip" "HoneyPot_GRP" {
  name                = "Honeypot_PublicIP"
  resource_group_name = azurerm_resource_group.HoneyPot_GRP.name
  location            = azurerm_resource_group.HoneyPot_GRP.location
  allocation_method   = "Dynamic" # Change to "Static" for a static public IP
}

# Create an NSG (Network Security Group)
resource "azurerm_network_security_group" "honeypot-NSG" {
  name                = "honeypot-NSG"
  location            = azurerm_resource_group.HoneyPot_GRP.location
  resource_group_name = azurerm_resource_group.HoneyPot_GRP.name
}

# Security rule for SSH on port 22
resource "azurerm_network_security_rule" "allow_ssh_port_22" {
  name                        = "Allow_SSH_22"
  priority                    = 300
  direction                   = "Inbound"
  access                      = "Allow"
  protocol                    = "Tcp"
  source_port_range           = "*"
  destination_port_range      = "22"
  source_address_prefix       = "*"
  destination_address_prefix  = "*"
  resource_group_name         = azurerm_resource_group.HoneyPot_GRP.name
  network_security_group_name = azurerm_network_security_group.honeypot-NSG.name
}

# Security rule to open all ports for TPOT
/*
resource "azurerm_network_security_rule" "open_ports" {
  name                        = "Honepot_Ports"
  priority                    = 1000
  direction                   = "Inbound"
  access                      = "Allow"
  protocol                    = "Tcp"
  source_port_range           = "*"
  destination_port_ranges     = ["0-65535"]
  source_address_prefix       = "*"
  destination_address_prefix  = "*"
  resource_group_name         = azurerm_resource_group.HoneyPot_GRP.name
  network_security_group_name = azurerm_network_security_group.honeypot-NSG.name
}
*/


#subnet
resource "azurerm_subnet" "HoneyPot_GRP" {
  name                 = "Honeypot_subnet"
  virtual_network_name = azurerm_virtual_network.Pot.name
  resource_group_name  = azurerm_resource_group.HoneyPot_GRP.name
  address_prefixes     = ["10.0.0.0/24"]

}

# create an Network Card for the Honeypot VM you can add more with count = 3  # number of NICs
resource "azurerm_network_interface" "HoneyPot_GRP" {


  name                = "Honeypot_NIC"
  location            = azurerm_resource_group.HoneyPot_GRP.location
  resource_group_name = azurerm_resource_group.HoneyPot_GRP.name

  ip_configuration {
    name                          = "internal"
    subnet_id                     = azurerm_subnet.HoneyPot_GRP.id
    private_ip_address_allocation = "Dynamic"
    public_ip_address_id          = azurerm_public_ip.HoneyPot_GRP.id

  }
}

#Password Variable
variable "admin_password" {
  type        = string
  description = "Admin password for the virtual machine"
  sensitive   = true
}

# Creating the Honeypot VM(Ubuntu Server 22.04)
resource "azurerm_linux_virtual_machine" "HoneyPot_GRP" {

  # count               = 3  # number of VMs
  name                            = "The-POT"
  resource_group_name             = azurerm_resource_group.HoneyPot_GRP.name
  location                        = azurerm_resource_group.HoneyPot_GRP.location
  size                            = "Standard_D4s_v3"
  admin_username                  = "azureuser"
  admin_password                  = var.admin_password
  disable_password_authentication = false


  network_interface_ids = [
    azurerm_network_interface.HoneyPot_GRP.id,
  ]


  os_disk {
    caching              = "ReadWrite"
    storage_account_type = "Standard_LRS"
    disk_size_gb         = 128
  }


  source_image_reference {
    publisher = "debian"
    offer     = "debian-11"
    sku       = "11-gen2"
    version   = "latest"
  }
}
The Terraorm code here deploys the Honeypot VM, Firewall Rules NIC, etc.
Configuring the Honeypot Server
when the VM and Resources are deployed by terraform I will connect by SSH and setup the Honeypot server. It is configured following these steps below:
- Connecting to the VM by SSH
This is a screenshot showing how to connect by SSH from the terminal
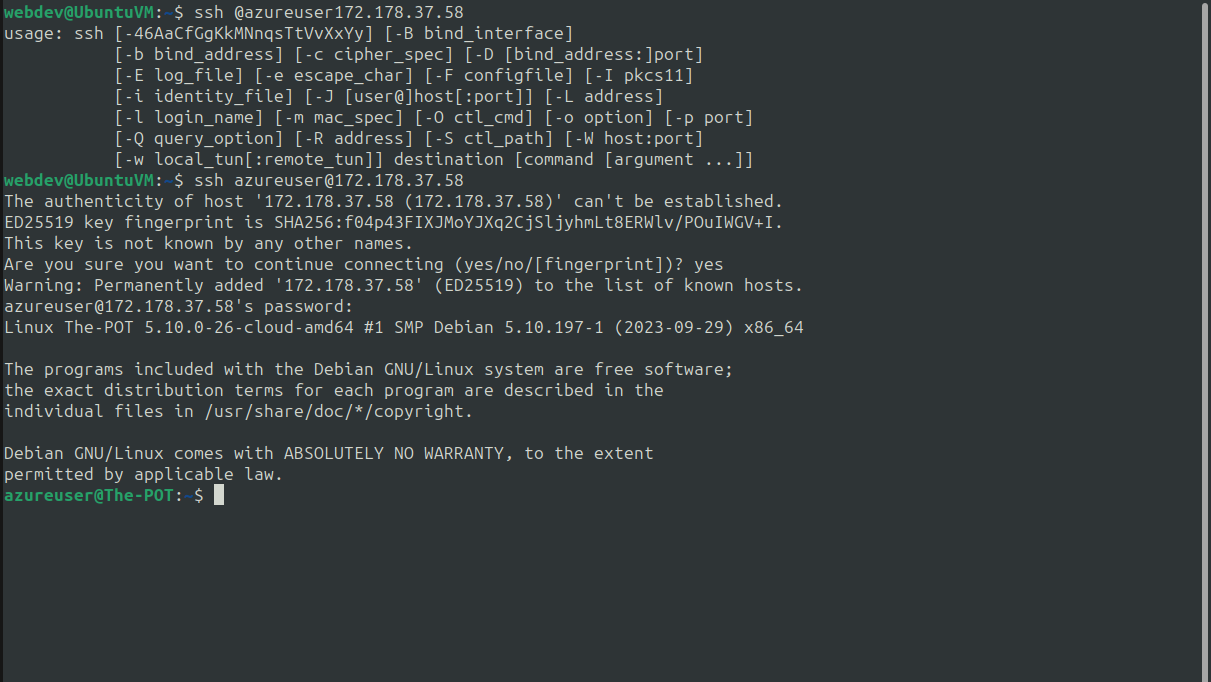 SSH Connection
- Updating and Installing Git on Debian
- Update repositories:
sudo apt update && sudo apt upgrade -y. - Install Git:
sudo apt install git.
- Update repositories:
- Downloading and Installing TPOT
- Clone the TPOT repository:
git clone https://github.com/telekom-security/tpotce. - Change directory to tpotce:
cd tpotce/iso/installer/. - Run the install script:
sudo ./install.sh --type=user
- Clone the TPOT repository:
 Install script webusername and password set
There is a prompt to set the web interface username and password during installation and it will take a while to install this gif is an example of what you will see.
- Connecting to the Honeypot Web Interface
- Connect to the web interface:
https://VM_Public_IP:64297.
- Connect to the web interface:
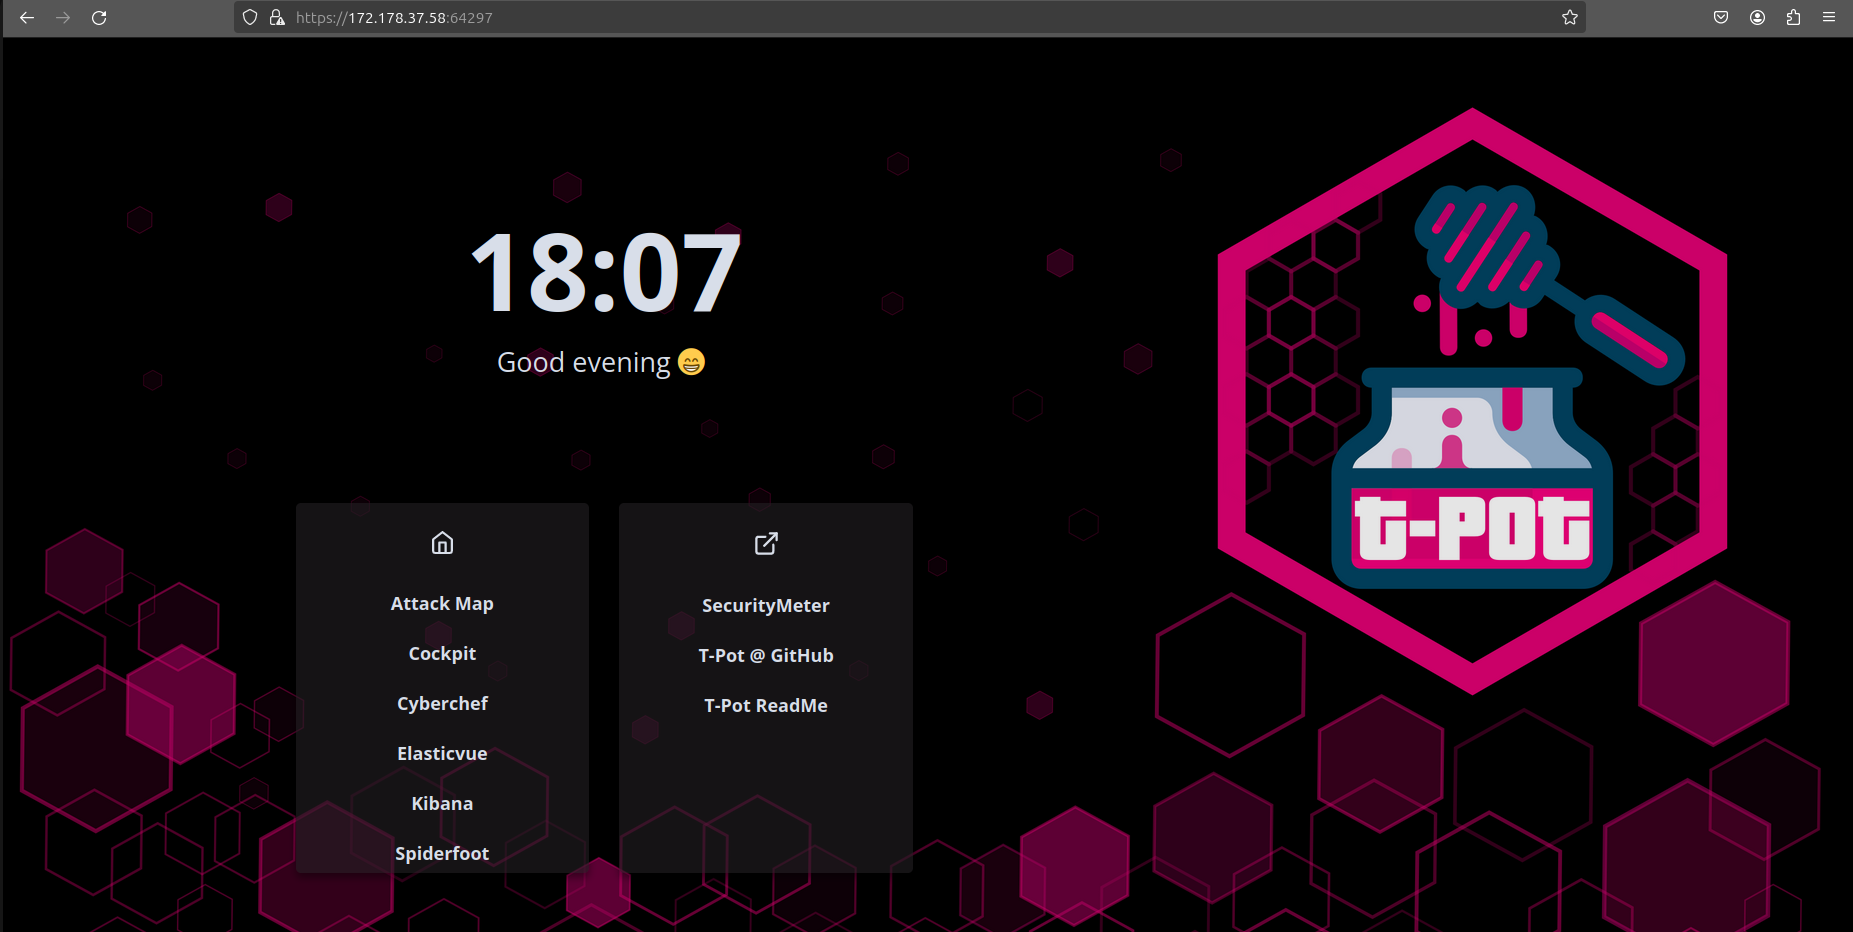 TPOT Web interface
If you encounter a problem signinng in to the web UI you may have been banned by fail2ban service to fix this by loggin via ssh and checking if fail2ban have any current bans. Check it with
sudo fail2ban-client statusand reset all bans withsudo fail2ban-client unban --all
- Important Ports
- The install script will make some changes to the VM to allow management of the honeypot. I have included all the important management ports in the table below.
| Port | Protocol | Direction | Description |
|---|---|---|---|
| 80, 443 | tcp | outgoing | T-Pot Management: Install, Updates, Logs (i.e. Debian, GitHub, DockerHub, PyPi, Sicherheitstacho, etc). |
| 64294 | tcp | incoming | T-Pot Management: Access to Cockpit |
| 64295 | tcp | incoming | T-Pot Management: Access to SSH |
| 64297 | tcp | incoming | T-Pot Management Access to NGINX reverse proxy |
Analyzing Attacks with the Honeypot Management tools
The TPOT honeypot comes with a set of management tools to analyze attacks, attempted username and passwords, log commands used etc. The Management tools use the Username and Password set during installation below is a table of the management tools and logins can be found in the readme.
| Service | Account Type | Username / Group | Description |
|---|---|---|---|
| SSH, Cockpit | OS | tsec | On ISO based installations the user tsec is predefined. |
| SSH, Cockpit | OS | <os_username>/<os_password> | Any other installation, the <username> you chose during installation. |
| Nginx | BasicAuth | <os_username>/<os_password> | <web_user> you chose during the installation of T-Pot. |
| CyberChef | BasicAuth | <web_user> | <web_user> you chose during the installation of T-Pot. |
| Elasticvue | BasicAuth | <web_user> | <web_user> you chose during the installation of T-Pot. |
| Geoip Attack Map | BasicAuth | <web_user> | <web_user> you chose during the installation of T-Pot. |
| Spiderfoot | BasicAuth | <web_user> | <web_user> you chose during the installation of T-Pot. |
| T-Pot | OS | tpot | tpot this user / group is always reserved by the T-Pot services. |
| T-Pot Logs | OS | tpotlogs | tpotlogs this group is always reserved by the T-Pot services. |
Attacks and Behaviour Analysis
Leveraging the capabilities of TPOT’s advanced management tools, we can dynamically understand cyber threats. TPOT seamlessly integrates tools that not only empower us to visualize the origins of attacks but also provide a comprehensive overview of IPs, IP reputation, their associated regions, the nature of attacks, and the behaviors exhibited—such as the commands utilized by attackers and their attempted compromises.
This rich and insightful data is dynamically translated onto a live map, offering a real-time representation of ongoing attacks. The visual narrative unfolds below through a series of screenshots and videos, captures the essence of these live attack maps. This provides a vivid portrayal of the ever-evolving cybersecurity landscape, ensuring a proactive stance in the face of emerging threats.
Live Attack Map
This animated GIF shows a representation of attacks on our honeypot, offering valuable insights into the cybersecurity landscape. The visualization provides information on the attacking IPs, color-coded indications of attack types, and a geographical breakdown by regions and countries. This animated snapshot not only captures the intensity of ongoing attacks but also presents a concise and visually engaging overview of the threat landscape our honeypot is actively monitoring.
 Live Attack Map
Analysis with cyberchef
This is a screenshot showing the cyberchef web ui utility.
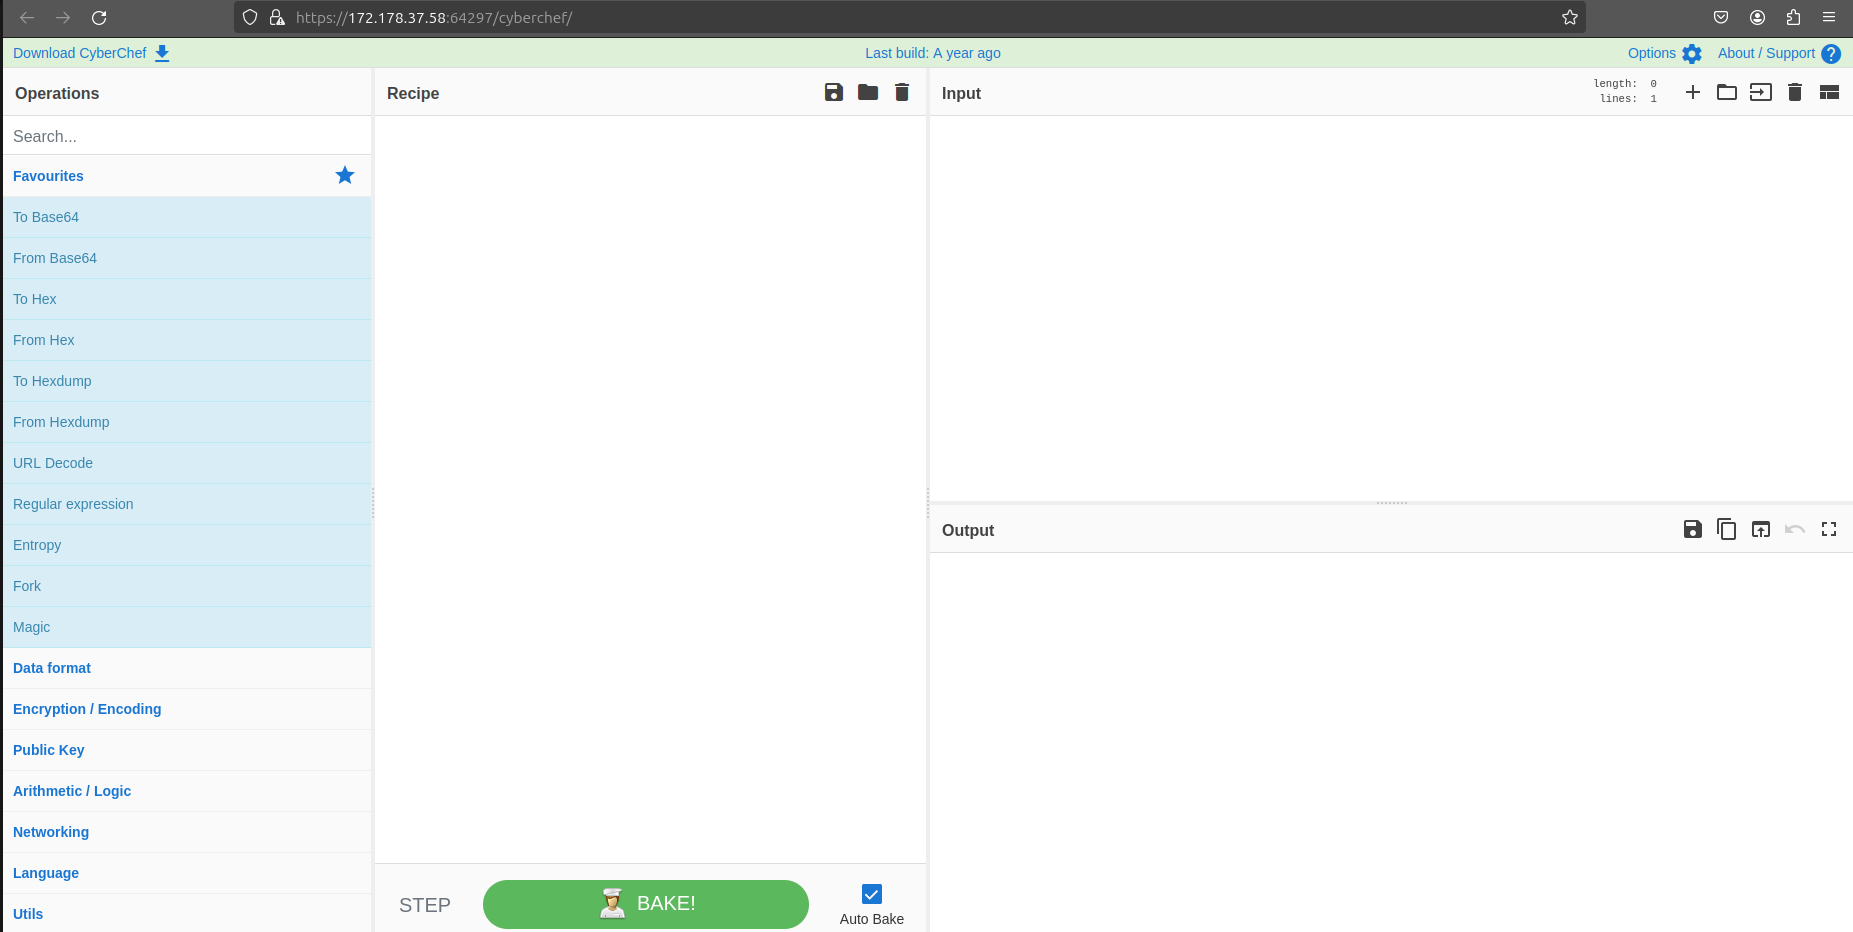 Cyberchef
Analysis with Elasticvue and Data visualization with Kibana
Elasticvue and Kibana web ui utility, TPOT uses Elasticvue to provide a user-friendly web interface for managing the Docker cluster and overseeing Honeypot activities and Kibana to show data visualizations which provide insights that aid security professionals in making informed decisions.
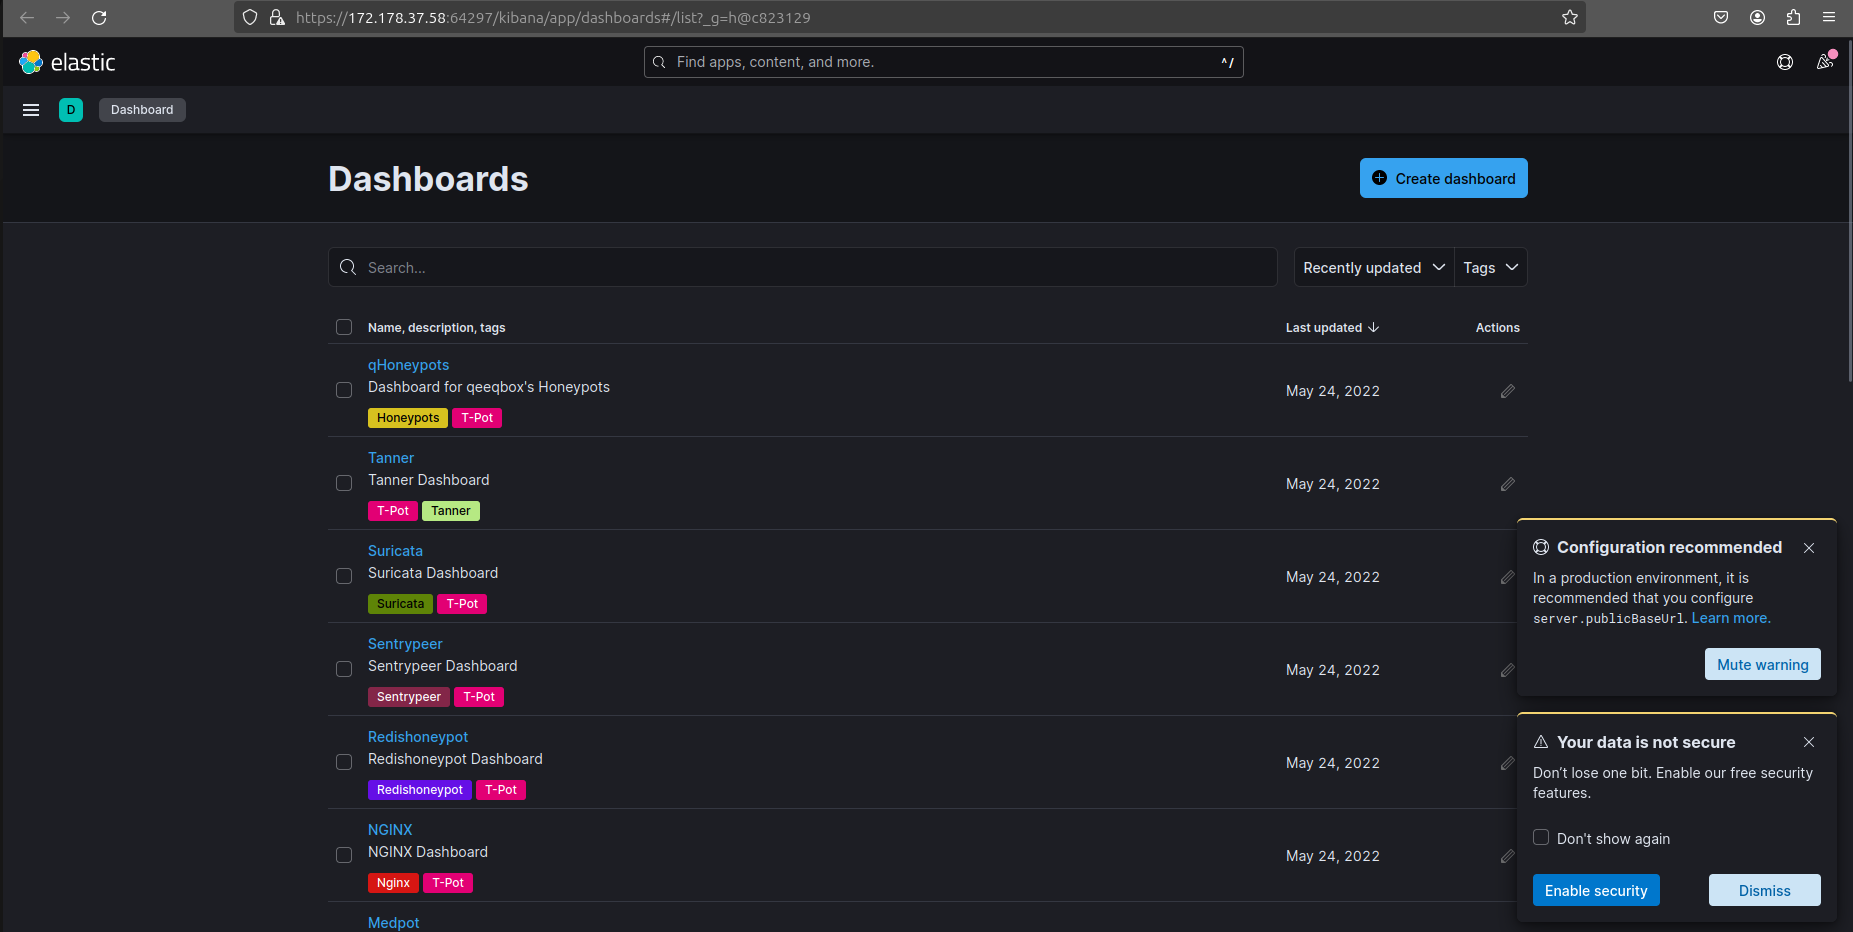 Elasticvue Dashboard
This is a screenshot showing the Cowrie container and its info in the Elasticve webUi.
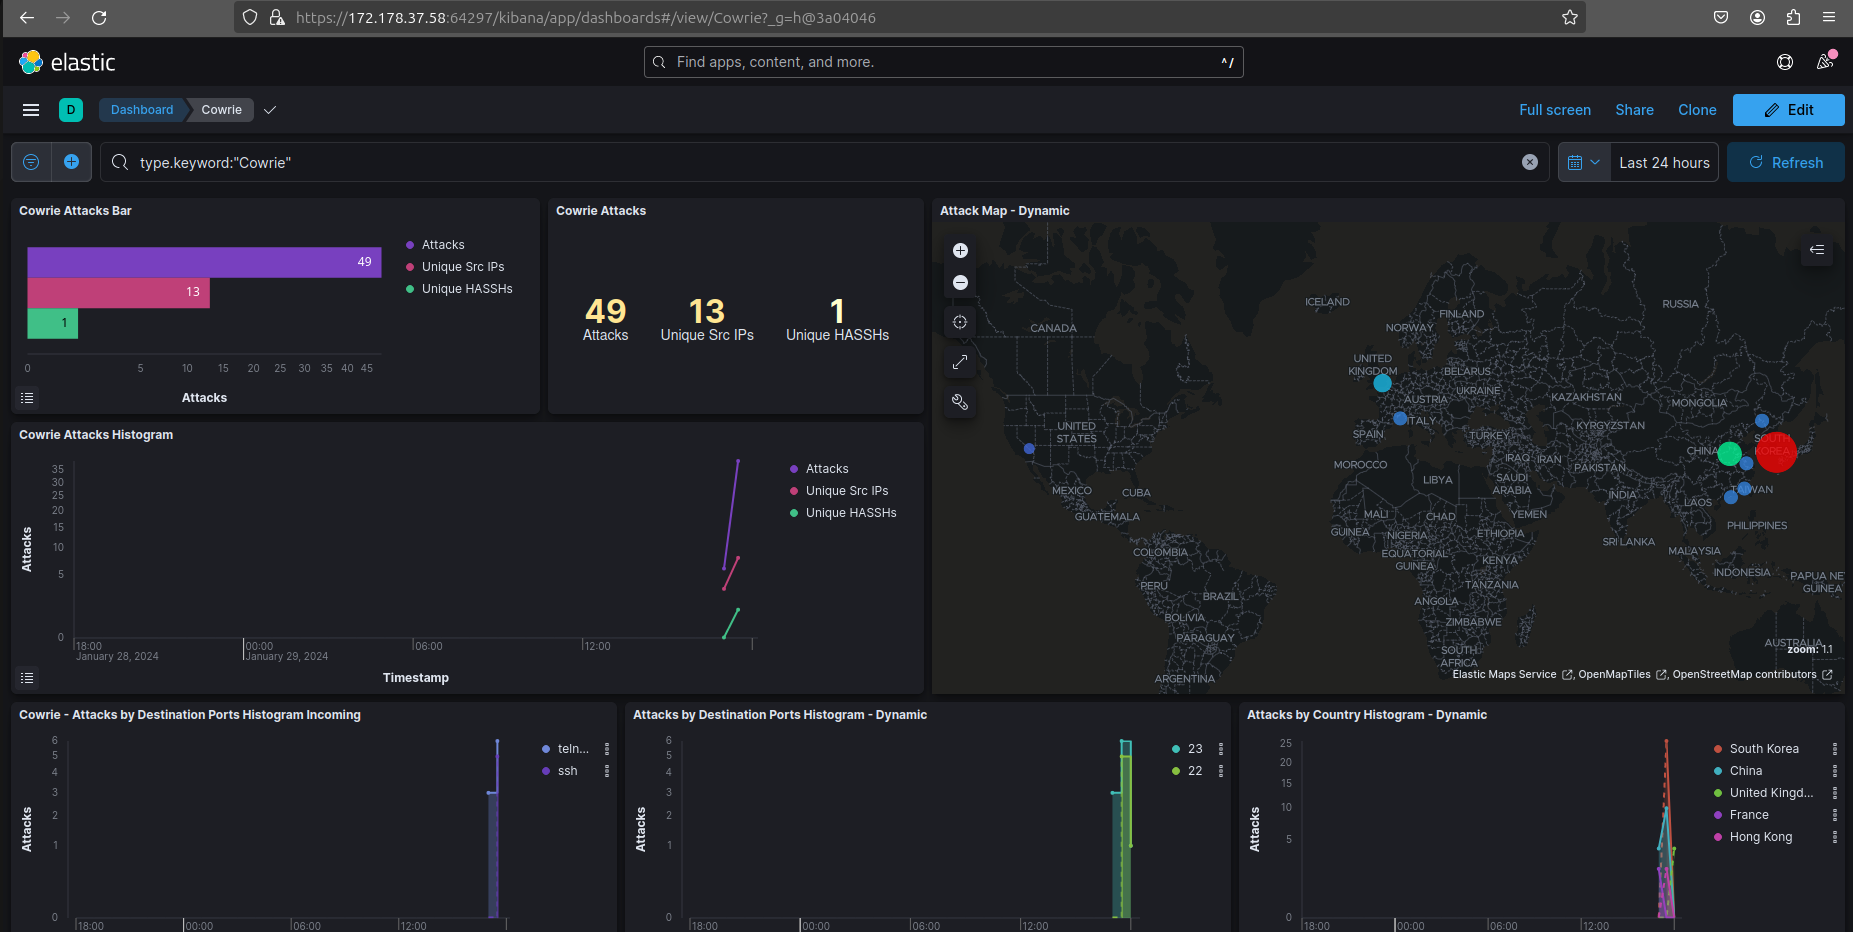 Elasticvue Cowrie
This is a screenshot showing the Cowrie container inforomation on attacker IPs and attempted username and passwords in the Elasticve webUi.
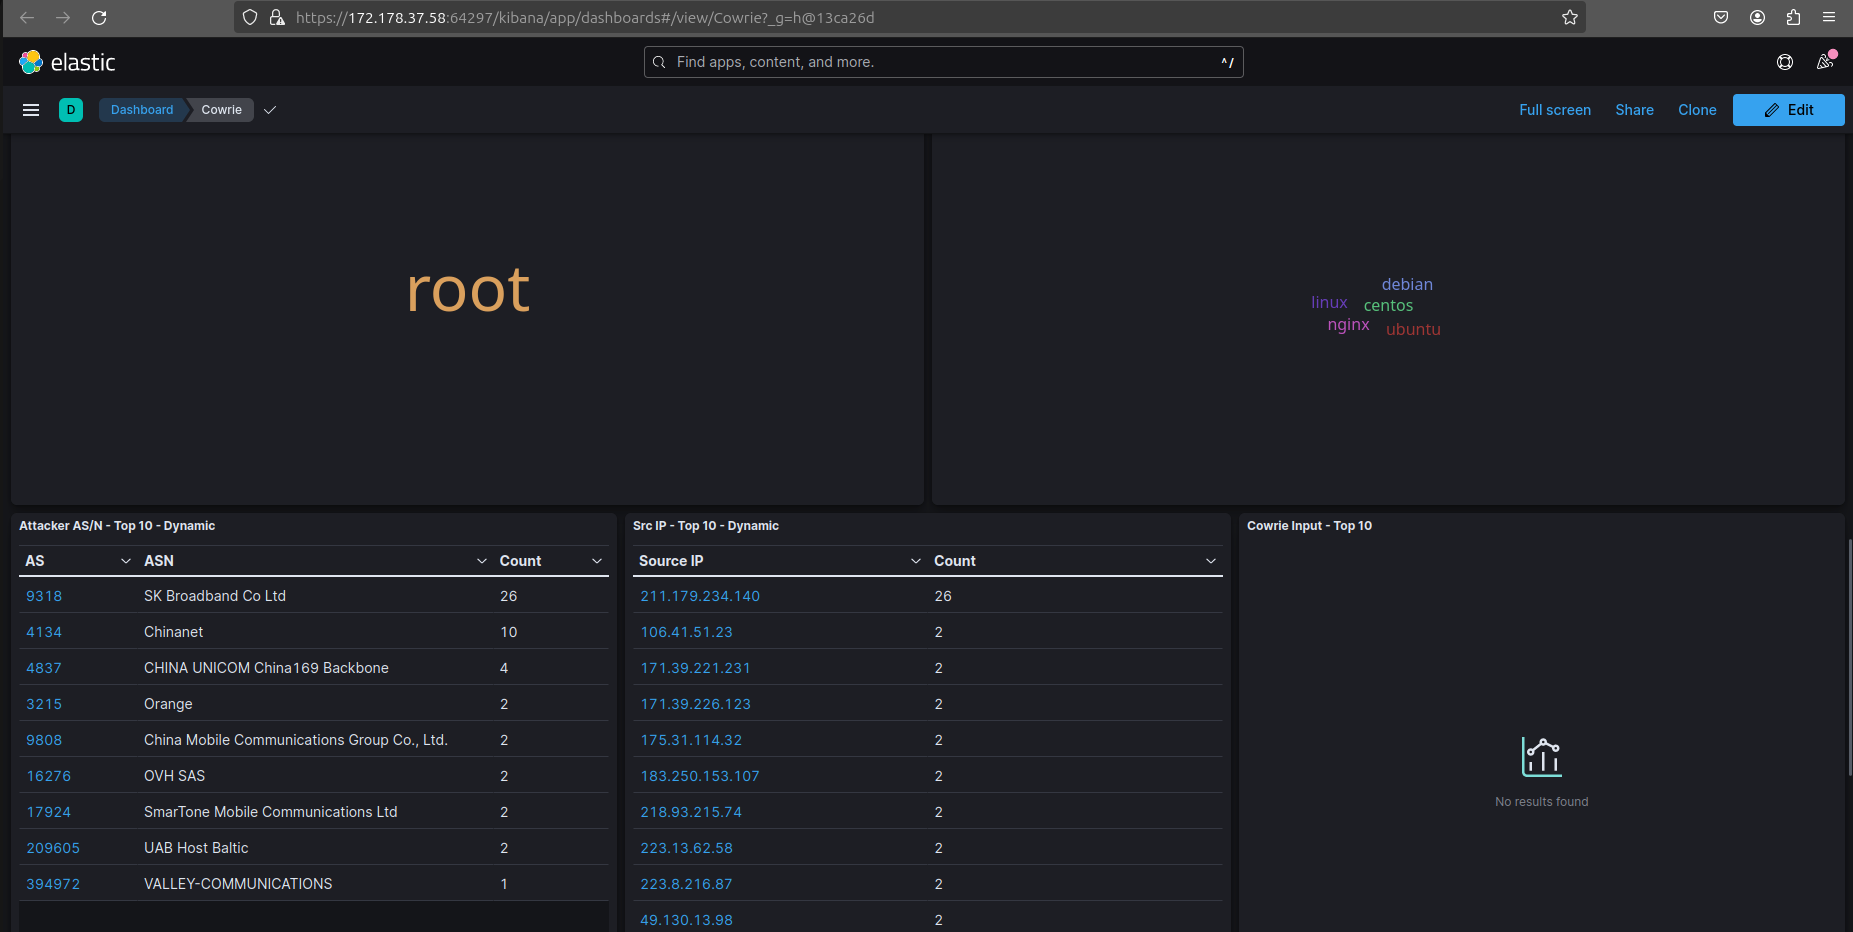 Elasticvue Cowrie information
IP address and Reputation Analysis with Spiderfoot
This is a screenshot showing the spiderfoot web ui utility, spiderfoot is an OSINT automation tool.
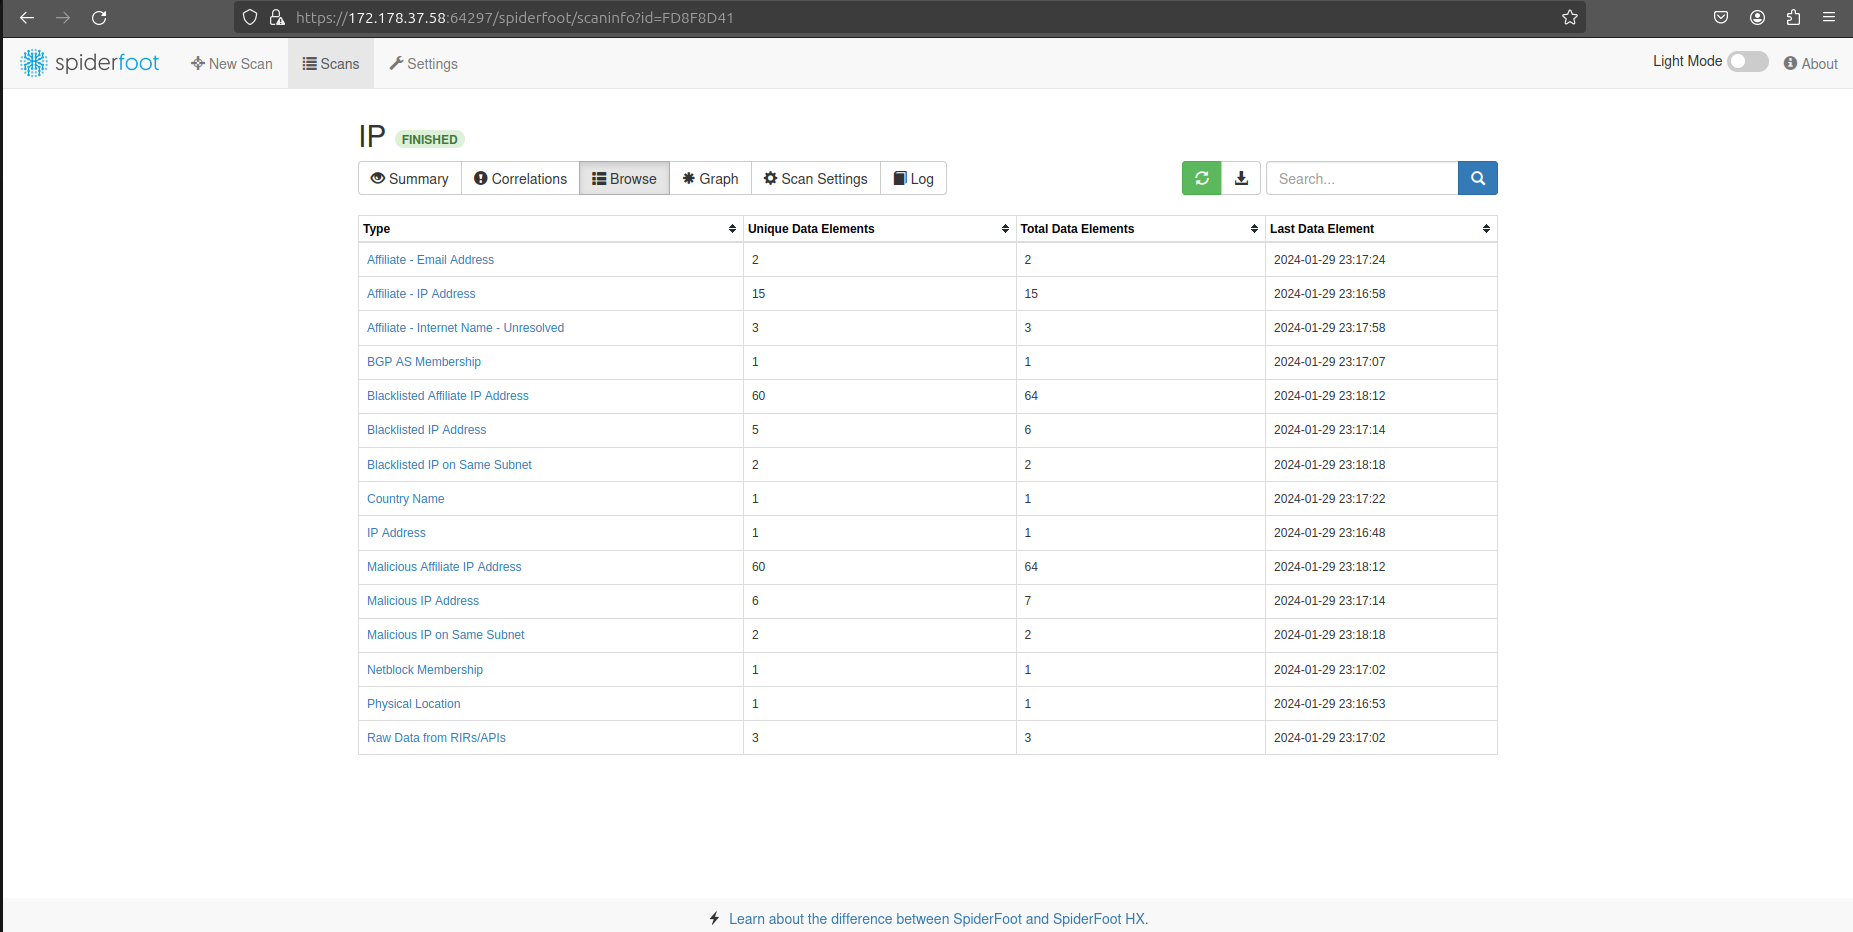 Spiderfoot Scan
 Spiderfoot extended Scan
Conclusion
In summary, the implementation of this honeypot project, supported by TPOT’s advanced management tools, has significantly enhanced our cybersecurity position. Through detailed data visualization, This empowers us with valueable insights, facilitating proactive monitoring and response strategies. As we continuously navigate the changing landscape of cybersecurity, this project reflects my commitment to staying vigilant and responding effectively as the cybersecurity landscape evolves.